Product photography- a thorny problem for more than just online sellers. And as we all know, buying online is EYE BUYING. So how to have a photo to introduce the product – Service beautifully and convey the full message, not everyone knows.
In recent years, due to the rapid development of the Internet and social networks. An extremely rich and diverse online retail ecosystem has been formed. Especially the sales model on social networks. This model has been growing rapidly in the past few years. The number of sellers participating in this model increased rapidly.
Through this article, I will share with you some product photography experiences. How to get the best product photos possible. Without investing in modern machinery and equipment.
1 Determine the shooting style.
In the world in general and in Vietnam in particular. There are many different styles of photography, the styles are divided by: shooting environment, shooting method, shooting angle, color used, photo content...
But you need to define what your style is. In other words, you need to know who your customer base is? And what kind of pictures do they want to see? From there, you buy equipment. Start composing photos with such style.
For example:
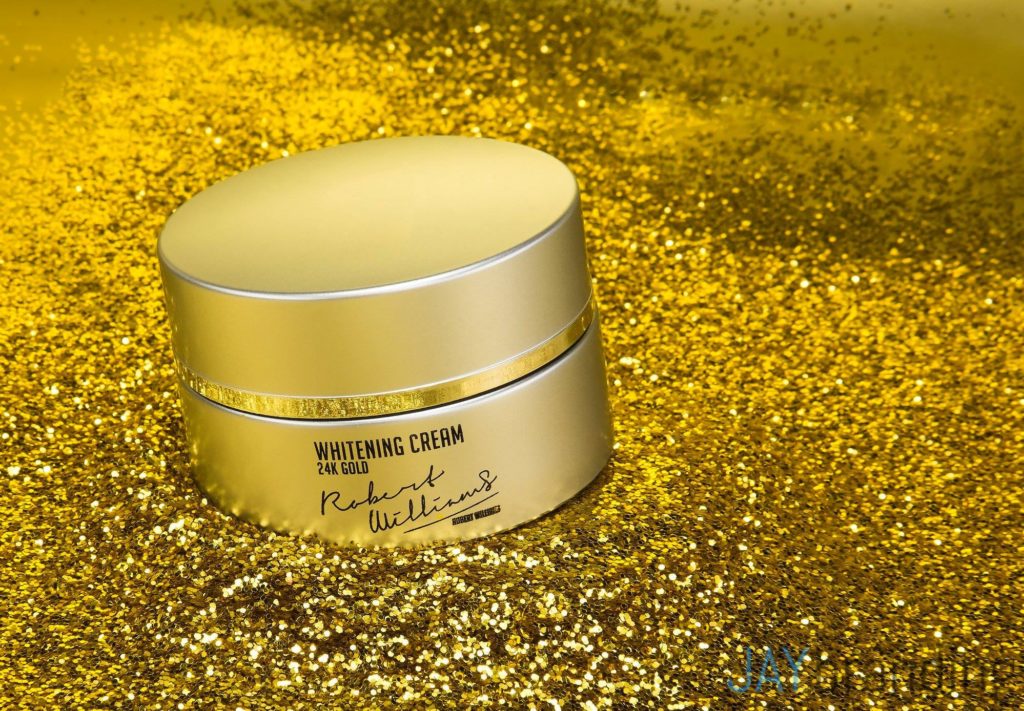
You are selling a product: Premium, great value. Then your photo must describe the sharpness: luxury, mystery, of the product.
You can use colors such as: Black, metallic yellow…
Or you are selling a product for teenagers. They also like photos that are blended and taken naturally.

After determining what style your photo is and what elements it needs. Let's start preparing the composition for the shoot.
For photos to post on the Internet. They don't need to be too high quality and don't require too much artistry either.
The top priority of a product photo is: Authenticity. The photo must depict the product accurately. So that when customers see the photo, they can imagine and feel the product like. That will greatly influence their purchasing decision.
2.Choose and arrange lighting when taking product photos.
Choose light:
In photography, light is divided into two types: natural light and artificial light. Natural light is understood as: Sunlight. Artificial light is: Man-made from light-emitting devices… such as light bulbs.
And the advice for you is: Use sunlight to take product photos because it is very "cheap".
Sunlight is a wonderful thing, because
We humans always see things under the sunlight. So things illuminated by sunlight will have more "realistic" colors. Although it may not be the color of the object.

The right time to photograph products with sunlight:
If you use sunlight to photograph products. Should choose time frame:
In the morning from 8am to 10am- In the summer it can be earlier. Because the light at this time is very clear and soft. Not as red as when the sun is up and not as harsh as at noon.
And if you can't shoot in the morning, you can shoot in the afternoon from 3am to 4pm, and not later. Because when the sun is about to set, the sunlight is also much redder. If you deliberately use that light, your product may not be standard when it comes to color.
The way to photograph products under sunlight in the time frame is not ideal.
If you have to shoot at noon, when the sun is shining brightly. You should choose shady areas or have objects that block light to take photos.
You can buy a cloth photography box. And taking it out in the sun is also very good.
How to shoot products in sunlight in a less than ideal time frame
Use the Box to take product photos
Then the sunlight will be softened by the white fabric of the shooting box. And create a softer, more uniform light on the inside of the shooting box.
Artificial light:
You will need to invest a small amount of money to buy some lighting equipment. And some widgets to handle the light.

Lighting devices:
Depending on how big or small the object you are photographing is. You will have to buy lights with appropriate capacity, or buy many lights. But there should be 3 or more light sources to be able to eliminate all the shadows of the object.
You should choose lamps: Compact or LED. Has a color temperature of 5500K- This color temperature is equivalent to sunlight. And the power of the lamp also depends on the type of lamp you choose. If you buy a Compact lamp, the minimum power of 50W or more will be enough for bright images to take.
Light processing devices:
Since the light from lamps often tends to be unevenly distributed; The place is too harsh, the place is too dark. So we need items to handle light such as: Defuser (dissipating light) or Reflector (shining light).
You can take advantage of the available materials; Or go to the Photocopy shop to buy A0 sheets of paper to use as Defuser & Reflector. This option is quite effective and economical.
Lighting layout:
Depending on the product and the lighting effect you want to use; There will be different lighting arrangements. But below I would like to introduce a few common lighting setup methods that people often use.
Light setup with small shooting area:
We use a minimum of 3 light sources to eliminate all the shadows of the product.
If you don't have a lot of lights, you can use reflectors. To reflect light into the product; Light balance when shooting.
Lighting setup with Studio:

The main light will have more power than the auxiliary light.
The auxiliary light will have a wider and more evenly distributed halo.
If there are not many lights, you can skip the Background lights and the hair lights. Instead, a reflector is erected on the left side of the object - Straight down where the lamp is down. To get the bright fringe on the left side of the object.
You can arrange the lighting as shown in the picture. Or you can also move these light sources at will. To get the lighting effect according to your needs.
Backdrops for product photography:
If you shoot Street Style; Just need a lens with a large aperture to capture fonts. (F of 5.6 and below is fine).
And when you shoot small products or take pictures in the room. We will need a background.
Choose a background:
The background can be anything available such as: Floor, stairs, wooden floor, drinking table, a rug, an A0 sheet of paper...
Depending on how you want to present your product, choose the appropriate background.

Note: Please choose backgrounds with less detail. Has monochromatic color and high contrast with the photographed product. So that when on screen, viewers will focus on the product more; Don't be distracted by colorful and confusing backgrounds.
You can also find Mika and Alu pictures at advertising shops; Or buy a mirror at a glass store for a shiny finish. Create a glitter reflection effect for your product.
If you shoot models and need large backdrops. You can buy it at photography equipment stores for only about 80k/m (1 meter long, and 2.7m wide for fabrics with all kinds of colors).
Backdrops for product photography
Above, I have just guided and shared with you my experiences in product photography. How to create beautiful photos with common equipment. To be able to design beautiful advertising photos by yourself.